Our Delicious Food

International Cooking at Home with Karin and Bruce Boschek

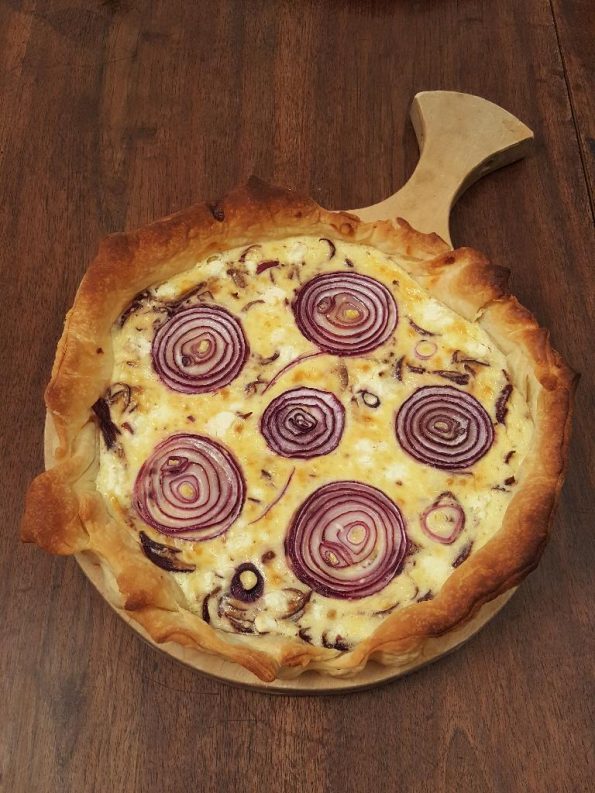
Beginning of Autumn with a German Apple Cake


In many families in Germany there is a tradition of making an apple cake  to serve with coffee when guests come to visit in autumn. One of the most beloved cakes is this apple cake with slit apples on top.


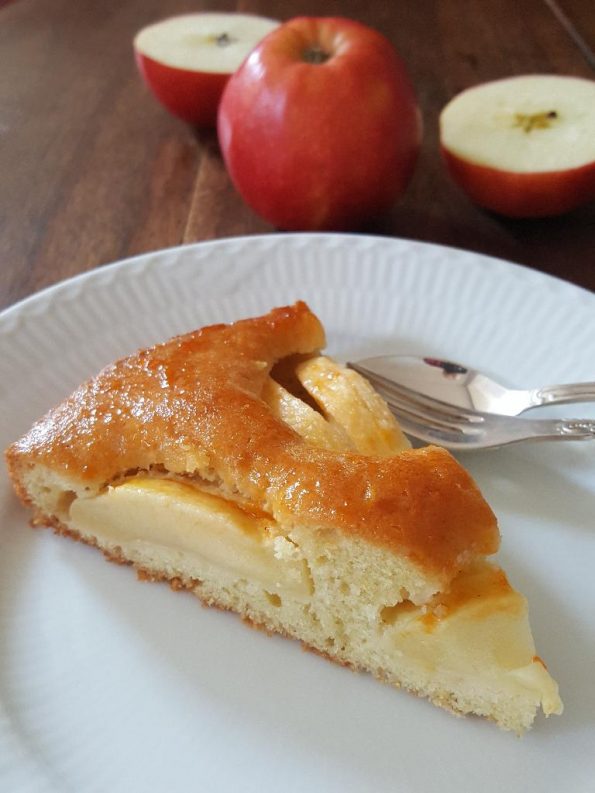
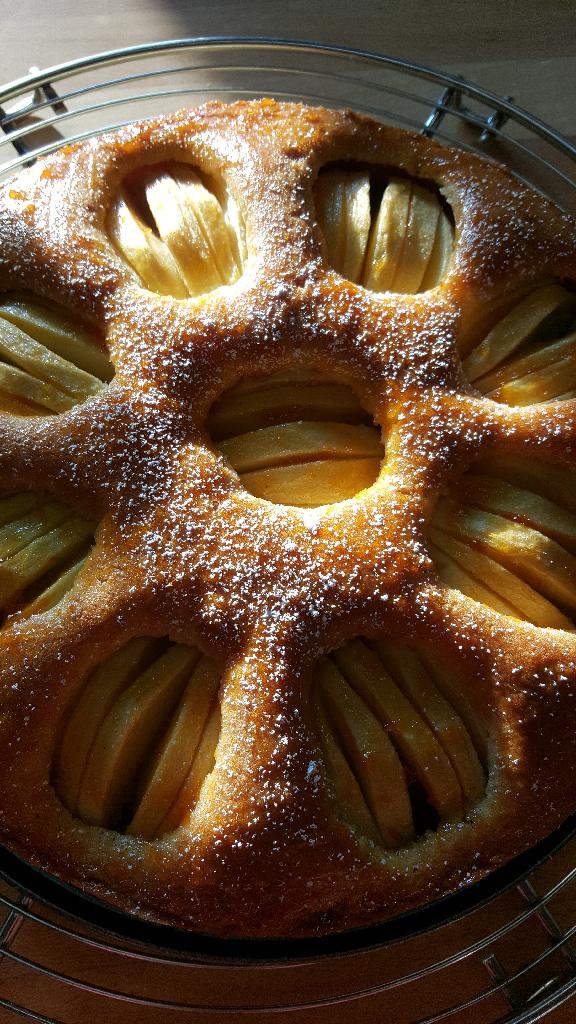
It’s difficult to see, but if you look closely the apple quarters have been slit lengthwise about 2/3 through similar to Hasselback potatoes. This is more obvious below after baking.


Recipe – German Apple Cake


Ingredients

26 – 28 cm (10 “– 11”) springform pan
shortening or spray to coat the pan (or 2 Tbl butter)
750 g (1.5 lb) apples for baking (Jonathans, Braeburn, Winesap, etc.)
125 g (1/2 cup) butter (room temperature or softened)
100 g (1/2 cup) white sugar
½ tsp vanilla extract or beans from one vanilla pod
¼ tsp salt
zest from one lemon
juice from one lemon
3 (m) eggs
200 g (1-3/4 cup) flour
2 tsp baking powder
2 tbl milk
2tbl apricot jam or
powdered sugar
Method

Prepare the pan by greasing the bottom and sides
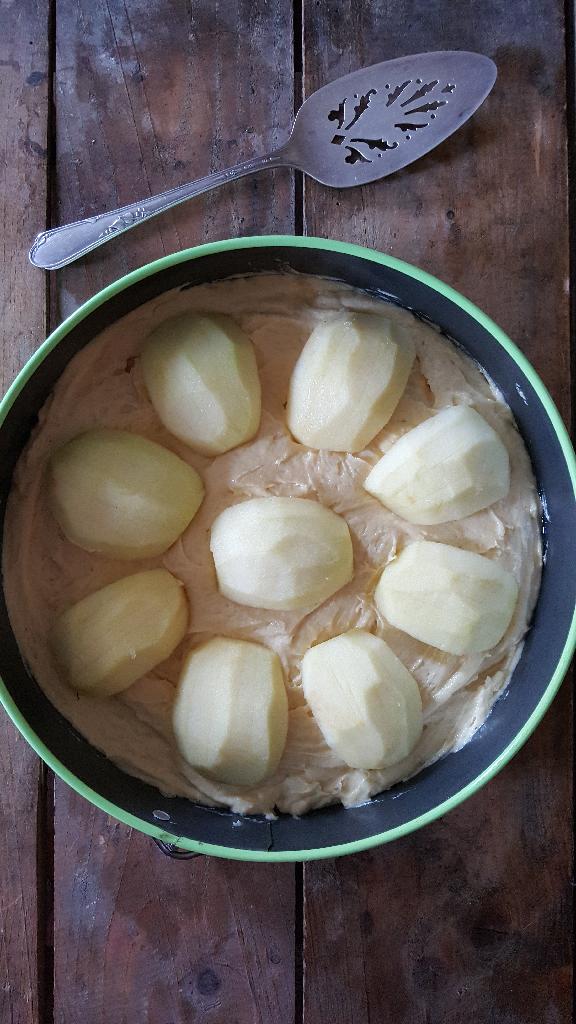
Peel and core apples, quarter and cut slits lengthwise (do not cut through – as for Hasselback potatoes) sprinkle with lemon juice
Preheat the oven to 180 °C (375 °F) fan-forced 160 °C (320)

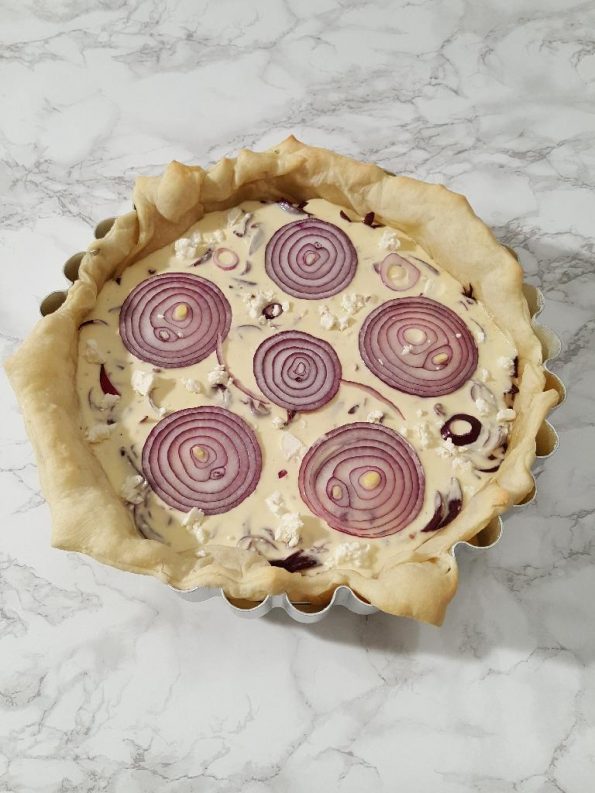
Prepare batter – Using a hand mixer cream  125g (½ cup)butter. Slowly add the sugar, vanilla, salt and lemon zest while creaming at medium speed. Add one egg at a time, beating at high speed for 30 seconds each. Mix the flour and baking powder together and  add in two batches, alternating with 1 Tbl milk (flour/milk/flour/milk) while beating at medium speed. Transfer the batter to the prepared spring-form pan and smooth the surface with a rubber spatula. Place the apple quarters equally spaced in a ring on the batter. Place the form in the lower third of the pre-heated oven.

Bake for 45 minutes or until light brown and baked through (cake tester or tooth pick)

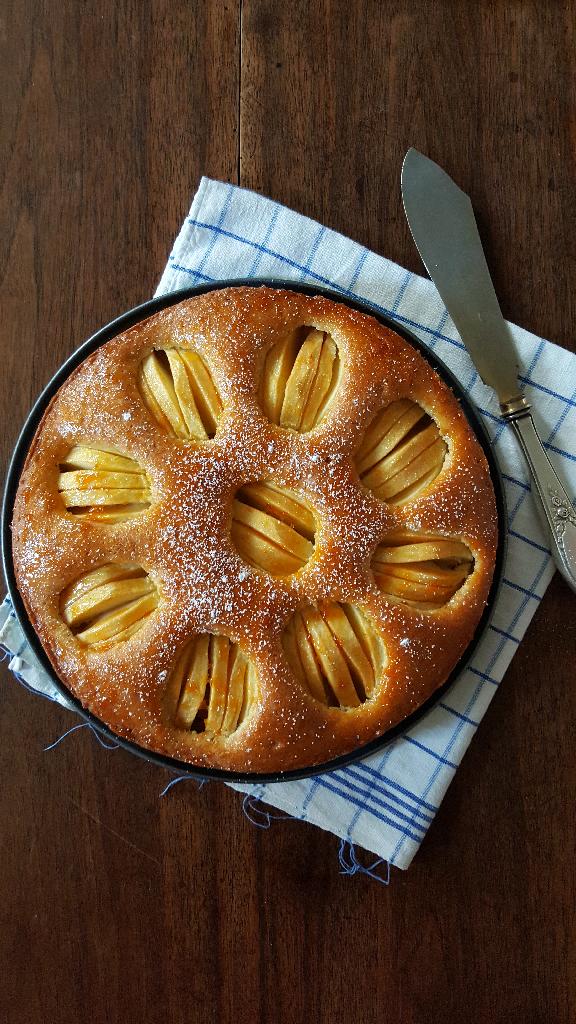
If using apricot jam, mix 2 Tbl jam with 1 Tbl water and heat just to a boil. Using a pastry brush coat the surface of the cake immediately after removing from the oven. Remove the outer ring of the pan and allow to cool on a rack.

If using powdered sugar allow cake to cool, remove ring and dust with powdered sugar.

Serve as is, with vanilla ice cream or lightly sweetened whipped cream (or both 😆 ).

This is wonderful served with whipped cream or ice cream


Our Classic Cream Scones


Red currants are amazing, and they grow well in almost any soil. They are astonishingly sour and need a good dose of sugar to overcome the large amount of ascorbic acid (more vitamin C than in oranges) and citric acid, however the taste is definitely worth it. We like to pull the little branches through the tines of a fork to get the berries off, then put them in sweetened yogurt or ricotta. They are a wonderful accompaniment to scones that we love to have for breakfast or in the afternoon for tea. I have been cutting the scones out as rounds or hearts or triangles, with or without raisins, currants or dried cranberries and sometimes with a citrus glaze. However, Karin bought this cast-iron wedge pan from Camp Chef a few months ago and I decided to try using it to make our Saturday breakfast scones. I sprayed it with baking spray and cut the dough into triangles that just fit the pan and baked until light brown. Of course, they took longer to bake than if cut out and placed on a baking sheet because the cast iron takes a good while to heat up. We were delighted with the moist, soft texture and will be using the pan regularly from now on. Here is our recipe, modified from a number of other scone recipes. Eggs tend to make scones heavier and denser so we do not use any, just sweet cream as liquid.

Ingredients

360g (12 oz) all purpose flour
2-1/2 tsp baking powder (we like tartaric acid based baking powder, but use what you have)
1/4 tsp salt
60 – 90 g (2-3 oz) sugar (vary according to taste)
90 g (3 oz) ice-cold butter cut into small cubes
210 – 240 ml (7 -8 oz) sweet whipping cream

Method

Preheat Oven to 190 °C (375 °F)
Mix or sieve dry ingredients in a large bowl, then using your fingers or a pastry blender work in the butter to a consistency of coarse corn meal. Add the smaller amount of liquid to begin with and carefully mix with a fork until a thick dough forms. If too dry keep adding cream until the dough holds together. It is better to have a somewhat sticky dough than a dry, crumbly dough. This depends upon the flour you are using, so it is a matter of trial at first. If using raisins, currants, chocolate chips, dried cranberries or bayberries, add them now and mix them in well.

You may pat the dough out into a circle, or using a rolling pin roll it out and then either cut out using pastry or cookie cutters, or cut into triangles to fit the greased or baking spray treated wedge pan. Place the cut out scones on a baking tray covered with parchment or baking paper or with a baking mat. Bake for 20 minutes. If using the cast-iron pan bake longer (about 30 minutes) until the scones are lovely light brown in colour.  Enjoy with butter, clotted cream, jelly or jam, honey or whatever else strikes your fancy. Scones are best when still warm from the oven.

No matter what you do with them, scones will become firm and dry if you store them more than a few hours. Pop them into the microwave for just a few seconds and they will magically come back to life.


Celebrating Summer Days


Summer is now upon us here in central Germany and with it comes a lot of work outside in the yards and gardens. The work, however, brings joy and we love our herbs and our roses, our trees gardens. In the evening there is always time to bake a pie.


Tandoori Spiced Curried Red Lentils with Tiger Prawns


With the warm weather and outside work we have been finding a number of recipes that don’t take a lot of time or energy, that are nonetheless delicious and are pleasant on the warmest of days. This dish of curried lentils just fit the bill and we thought our viewers would enjoy it here, too. Our version is modified from a recipe we found in “Taste of Home, Canada.

We have enjoyed this meal twice recently and it is excellent, easy to prepare and requires only one pot and one skillet. It can be varied by using baby shrimp, scallops or even white fish. Tandoori paste is available in most supermarkets these days, or in specialty Asian markets or from Amazon. All the rest of the ingredients should be easy to obtain.


Here is the recipe with some discussion about possible variations. The basic recipe is in the recipe register.

Ingredients for 4 servings

24 shrimp cooked
1 can chopped tomatoes
16 oz. (400 g) dried red lentils
2 tbsp tandoori curry paste
1 tbsp curry powder
2 tbsp extra virgin olive oil
1 tsp ground turmeric
1 tsp ground cumin
1 tsp chili powder
1 tsp salt
1/2 tsp ground black pepper
1 large onion diced
1 garlic clove minced
1 bell pepper diced

Instructions

Rinse lentils well in cold water until the water remains clear. Place lentils in saucepan, cover with water (1 to 2 cups, or 250 to 500 mL) and simmer, covered, until lentils are tender, approximately 20 minutes. If needed, add more water while cooking. Drain lentils and set aside.

Meanwhile, in large skillet, heat olive oil over medium heat. Sauté onion, bell pepper and garlic until softened. In a small bowl, combine tandoori paste, curry powder, turmeric, cumin, salt and pepper. Add curry mixture to onion and continue cooking over high heat for 1 to 2 minutes. Add the tomato and reduce heat. Taste and adjust the heat by adding the chili powder. You can easily vary the seasoning according to the curry powder you use. If not spicy enough for your taste add more chili powder. Some curry preparations are already so spicy you may need to use less chili. Best try before serving!

Stir in baby shrimp and lentils, and simmer for about 5 minutes. If using raw shrimp simmer until the shrimp are pink.

When lentils are heated through, divide between four dishes and serve. We also like to adorn the plates with fresh coriander green (cilantro).

Note: This is one of those recipes you can vary in many ways. You can add other vegetables or replace the bell pepper. The original recipe called for tomato paste rather than canned tomatoes. This makes a much dryer dish, which some people may prefer. The seafood can be replaced with tofu or sauteed chicken breast. Many variations are possible.

We will be putting up more Indian recipes in the next months as they are so varied and interesting, not to mention that they are delicious!


We love our home and its cozy warmth in the winter, but the summer is special, perhaps because it is relatively short here where we live. When the weather is nice in the summer we are outside, enjoying the beauty of our yards and gardens. We try never to take for granted the beautiful surroundings and the opportunity we have to live and care for this island of peace and tranquility.


Thanks to everyone who has subscribed to this blog. We are overwhelmed by the number of people who have chosen to join us on this adventure. Please leave comments if you enjoy something or would like us to bring something special.


Springtime is Pie Time

After an unusually long winter here in central Europe we find ourselves surrounded by the sights and smells of springtime. We can sit outside in the evening in short sleeves and enjoy our wonderful garden.

Although our yards are more like a park, we do have some fruits and vegetables including apples, pears, asparagus, chard and rhubarb. This last Sunday we picked some rhubarb and made a tarte tatin, which was very nice. Karin, the pie baker, decided on something different, however, a rhubarb and strawberry pie.

We’re using the rhubarb and strawberries here more as an example. There are endless combinations of delicious berries and fruits that will make gorgeous pies.

There are also almost endless possibilities for decorating pies. The braids above are  just one and below is another example.

If you would like to have some more inspiration on decorating pies please go to Instagram and look at Karin’s page (karinpfeiffboschek). Let your imagination guide you and don’t be afraid to try out new and unusual designs. Do, however, try to be as careful and accurate as you can be.

The difference between a “nice pie” and one that is artistically pleasing is in the details. Notice in the pictures of the unbaked pies that every detail is nearly perfect. It takes time to achieve this and a warm kitchen makes it very difficult so that it becomes necessary to put the pie and the rest of the dough  in the refrigerator once they become too soft. It is also useful to place the pie in the refrigerator before baking. This also makes it possible to bake the next day, if it gets too late in the evening.

The recipe we use for these pies is in the recipe section and describes in detail how to prepare the dough, both using a food processor and by hand.

Here is the recipe for the rhubarb and strawberry filling:

Filling for one 9″ pie

700g (4 cups) coarsely chopped rhubarb

200g (1 cup) white sugar
1/4 cornstarch
About 8 large strawberries or more if smaller – cleaned and sliced
1 egg separated

Method

Recipe for pie crusts in the recipe section.
Mix rhubarb, sugar and cornstarch in a pan, heat slowly stirring gently so the sugar does not burn. You can add a couple of tablespoons of water to get things going a bit. Heat until the rhubarb begins to soften and the starch thickens. Don’t overcook and stir gently so the rhubarb does not completely disintegrate. Let cool.

Preheat the oven to 200 °C (400 °F).

Roll out the bottom crust and line a 9″ pie pan. Brush egg white  on the inside to keep the filling from soaking into the crust. Add the rhubarb filling, smooth out with a pallet or knife and place the sliced strawberries on the top.

Roll out the top crust and decorate , or make a lattice crust as desired. Add the egg yolk to the white and beat vigorously so the whole egg is smooth. Brush the egg on the surface of the decorated pie making sure to get an even coat on all parts.

Place on the middle rack in the hot oven. After 20 minutes turn down the oven to 175 °C (350 °F) and bake for an additional 50 minutes. If the upper crust begins to get too dark cover lightly with a sheet of aluminium foil.

Allow to cool on a wire rack and then take pictures to share with your friends on Facebook or Instagram! 🙂

Enjoy with vanilla ice cream or  whipped cream.


Banana Nut Bread

Most people enjoy eating bananas, if they are not green and not overripe. The problem is, if you buy 6 bananas and you wait until they are just right for eating you probably will enjoy one or two, perhaps even three, and the rest quickly get brown or black spots and are no longer a joy to eat. It probably is not a secret that very overripe bananas are excellent for baking. This recipe has been a favourite of ours for many years. I found it in my mother’s copy of the 1984 Church Women United of Greater Hammond (Indiana) recipe collection and this particular recipe was attributed to a Ms. Donna Hasten of Highland, Indiana. I usually make it in one larger loaf pan, but the original recipe calls for two small pans. You can bake it any pan you like, just test with a cake tester or tooth pick to make sure it is baked all the way through to the middle.


Recipe – Banana Nut Bread

8-1/2″ (22 cm) loaf pan buttered and floured

3/4 cup (150 g) white sugar
3/4 cup (150 g) brown sugar
1/2 cup (100 g) butter
2 eggs beaten
1 cup mashed overripe bananas
4 Tbl buttermilk
1/2 tsp soda
1/2 tsp salt
2 cups (250 g) white flour
1 cup walnuts (roughly chopped – large pieces)
1 tsp vanilla extract

Glaze (optional)
1-1/2 cups of confectioners sugar
3-4 Tbl milk
1 tsp vanilla extract

Cream the sugars and butter (good opportunity to use your stand mixer with paddle, if you have one). Add eggs, one at a time. Add bananas, buttermilk, soda and salt and mix. Add flour mixing in small amounts at a time, then add the nuts and vanilla and stir.
Pour in prepared loaf pan and bake at 175 °C (350 °F) for 45 min and test for doneness with a cake tester or wooden skewer. Make sure to test in the middle and thickest part to be sure it is baked through. Allow to cool 10 min on a rack before removing from pan. Then allow to cool completely before cutting.

If you chose to glaze the top, slowly add the milk the confectioners’ sugar until the proper consistency. Add a little more milk if necessary. Stir in the vanilla and drizzle the glaze over the cool loaf. Allow to firm up before cutting.


Stuffed tomato with egg and bacon – a tomato with a difference


Something for a quick meal or to serve for breakfast, at a buffet in the evening, at midnight? This is easy, looks good and tastes great.

This is best with larger tomatoes that are not too ripe. Preheat the oven to 200 °C (400 °F). Cut a small cap off the top of the tomato and scoop out the seeds and veins inside with a spoon or small ice cream scoop. You may need to cut the veins with a knife before scooping them out. Place the tomatoes with the cut side up in a pan or baking dish that has been coated with oil. Set aside.

Fry the bacon and place on kitchen paper to drain off the grease. Cut into small pieces. Break open the eggs and let one egg glide gently into each tomato. Place a few pieces of bacon into each tomato, then sprinkle oregano, salt and pepper over the egg. Sprinkle freshly grated Parmesan cheese over the stuffed tomatoes and place the dish or pan in the hot oven for 25 to 30 minutes or until the egg is set to your liking. For breakfast you may like to serve slices of buttered toast with these tomatoes, in the evening some toasted bread with olive oil and garlic would be excellent. A great way to make the toast is to slice the bread in thick slices, drizzle with olive oil and slivered garlic, then place in a hot oven for 5-6 minutes. Whatever you decide to serve as an accompaniment we are pretty sure you will enjoy these stuffed tomatoes. Oh, and there are many other additions and variations you can make. Add a little shrimp to each tomato, or some sauteed onion. some herbs or spices. Or replace the bacon with ham or small cubes of cheese. Or use big beef heart tomatoes, increase the baking time and make a full meal of it. There are almost limitless possibilities to varying this dish and they will all be delicious.


Another tasty quiche – A full meal all by itself

Coconut Curry Quiche with Chicken Breasts


As I was translating the recipe for the onion and red wine tart we noticed this recipe in the same book (Alfons Schubeck and Annik Wecker “Raffinierte Tartes – süß und pikant”). It is especially interesting as it can be served as a full meal. It takes somewhat more time than some of the tarts and quiches we make, but is certainly worth it.

A note about curry powders. There are considerable difference in the mixtures of spices sold as curry powder. If you find one you really like make sure to have a supply. The final taste of a dish like this quiche will depend upon the curry powder you chose. Some are very intensive and may be spicy hot, so it is good to know what you are using. It is also usually worth spending a bit more money on a good quality mixture.

Recipe – Coconut Curry Quiche with Chicken Breasts

Quiche pan 28 cm (11″)
can also be made in a smaller (9″) pan

For the pastry

1 Tbl sugar
¼ tl salt
½ tl chili finely ground
300 g (10 oz) puff pastry
1 egg white (retain yolk)

For the filling

1 red bell pepper
250 g (8 oz) broccoli
3 scallions or spring onions
2 chicken breasts (about 250 g or 8 oz)
salt and pepper
200 g (6 oz) cream
100 g (3 oz) unsweetened coconut milk
2 eggs (m
1 egg yolk (from egg for white, above)
salt
2 tsp curry powder

Instructions

Coat the pan with melted butter or non-stick spray.
Preheat the oven to 220°C (430 °F). Mix the sugar, salt and chili in a small bowl and use in place of flour to roll out the pastry. Line the pan with the pastry, prick the whole bottom surface and place in the refrigerator for at least 30 minutes.
Cover the inside of the pastry with parchment, fill with baking beans or weights and bake blind for 10 min. Remove paper and weights and bake for 5 – 10 minutes further. Brush on egg white and bake for 1 – 2 minutes longer. Remove from oven and reduce oven temperature to 200 °C (400 °F). (Note: You can just use the pastry after refrigeration and without baking blind, however it will not be crisp and may become soggy.)

Blacken the skin of the bell pepper by placing it over the gas flame or under the grill. When blackened thoroughly place in a bowl and cover tightly with cling wrap for 10 minutes or longer. Wipe off burnt skin with paper towel, remove seeds and veins and cut into thin strips. (Do not wash! If small bits of blackened skin remain they will not hurt and will just add a bit of roast flavor).

Break or cut the broccoli into small pieces, removing any tough skin and peeling and slicing the stalk if used. Boil in salted water or steam until al dente, quench with cold water and drain in colander. Slice the scallions or spring onions into rings, rinse, dry and cut the chicken breasts into bite-sized pieces.

Gently mix the chicken breast pieces, bell pepper, broccoli and onion in a bowl, add salt and pepper and spread in the pastry shell.

Lightly beat the eggs and egg yolk, mix in the coconut milk and cream, salt and curry powder. Pour the mixture over the filling in the shell and place on the lowest rack in the preheated (200 °C – 400 °F) oven for 50 – 60 min. Cover lightly with aluminum foil for the last half of the baking time to keep the edge from turning too dark. Allow to cool on a rack for 15 min before removing from the pan.


An unusual savory tart for a winter day

Onion and Red Wine Tart with Feta Cheese


We had seen this recipe in Alfons Schubeck and Annik Wecker’s book, “Raffinierte Tartes – süß und pikant” a number of times, but never got around to trying it until recently. We didn’t have any open port wine so we substituted sherry, which probably changed the flavour somewhat, but was quite good. Many recipes for this tart call for goat cheese, but we prefer it with feta, made from sheep milk. For the picture we put some raw onions on top of the filling, however this isn’t really necessary and some people may have difficulty digesting raw onion. It’s just a matter of taste. We paired this with a dry German Riesling and enjoyed it on a wintry Friday evening.

Recipe – Onion and Red Wine Tart with Feta Cheese


Tart form 24 – 26 cm (9 or 10 inch)

Crust

300g (10 oz) puff pastry

Filling
2 red onions (about 200 g or 6 oz).
1 Tbl powder sugar
50 ml red port wine or sherry
150 ml red wine
1 small bay leaf
10 drops of vanilla extract or ¼ vanilla pod
1 tsp honey
salt, pepper
dash of allspice ground
150 g (5 oz) feta cheese
100 g (4 oz) cream
2 eggs
1/8 tsp chili powder or 1 fresh chili  deseeded, deveined and chopped
1 tsp fresh thyme chopped (or 1/8 tsp dried thyme)
1/8 tsp freshly ground nutmeg

Instructions

Preheat oven to 220 °C (430 °F)

Coat form with melted butter or non-stick spray

Roll out the pastry large enough to cover the tart form including the walls of the form

Using baking beans or ceramic weights bake the shell blind for 10 minutes at 220 °C (430 °F), remove the beans or weights and bake further for 5 – 10 minutes.

Lower the oven temperature to 200 °C (400 °F).

To make the filling peel and halve the onions and slice into strips. Heat the powdered sugar in a deep pan until it begins to melt. Let caramalize to light brown, but do not let burn. Add the onions and sautee in the caramalized sugar for a few minutes. Add the bay leaf and vanilla and then deglaze the pan with the port and the red wine and continue heating to reduce the liquid. Stir in the honey, salt, pepper and allspice and allow to cool. When cool remove the bay leaf (and vanilla pod if using) and spread the onions in the tarte shell.

Break up the feta cheese into a blender or into a deep cup, if using an immersion blender. Add the cream and eggs and blend until creamy. Mix in salt, pepper, chili, thyme and nutmeg to taste. Spread the cheese mixture over the onions.

Place the tarte on the lowest rack in the preheated oven and bake for 20 – 25 min or until golden brown. Allow to cool 10 minutes before removing from the form and serving.


A Seafood Waffle

Karin recently brought home a new cooking magazine and while browsing the pages I ran across this unusual recipe. Putting noodles and shrimp in a waffle iron sounded so strange I just had to try it, especially since is simple and we had all of the ingredients.

Asian Mie Noodle and Shrimp Omelette Waffle

Ingredients for 4 portions

150 g (5 oz) shrimp, shelled and deveined
200 g (7 oz) mie noodles
small bunch of chives
1 fresh red chili pepper
4  eggs (m)
Salt
oil for the waffle iron
2 Tbl mayonnaise
green salad leaves, cucumber sticks, green coriander (cilantro)
Sriracha sauce to serve

Instructions

Wash shrimp or thaw and rinse if frozen. Place the noodles in a bowl and cover with boiling water. Leave in the water for 5 minutes so the noodles are just al dente. Pour noodles into a colander and rinse with cold water. Cut into shorter pieces with a scissors. Chop the chives into little rolls, slit the chili open and remove the veins and seeds. Wash and cut into fine strip.

Beat the eggs in a bowl and add the noodles, shrimp, chives and 1 tsp salt. Mix well. Heat the waffle iron and coat the surfaces with oil. Put enough noodle-omelette mix in the waffle iron to not quite fill the indentations. Add a bit of the egg mixture  in the bottom of the bowl to each waffle. Bake for about 4 minutes until golden brown. Place the finished waffles in a warm oven (80 °C – 175 °F) while baking the rest.

Mix the mayonnaise with 1-2 Tbl water and stir until smooth. Drizzle a stream of the mayonnaise mix over the waffles and add Sriracha according to taste. Serve with fresh green salad leaves, cucumber and coriander.

A Spanish recipe with Russian Influence


Spaghetti Rasputin


I spent a few enjoyable weeks in Spain in the late 1990s. Much of the food was memorable, but none of the dishes influenced me more than this one, served in a small, but excellent restaurant in Madrid. In fact, I enjoyed it so much that upon return to home I immediately tried to emulate it, with some success. It is very simple, but delicious and attractive. We have probably made it 100 times over the last 20 years. Only recently did I learn that it is, in fact, at standard recipe in Spain, however I have no idea how that came to be. In any case it is called Spaghetti Rasputin, named after Grigori Yefimovich Rasputin, the mystical adviser and healer friend of Czar Nicholas II. The connection with this “mad monk” would appear to be the dollop of caviar that adorns the dish, and possibly the sharpness of fresh chilies. Be that as it may, it is wonderful and quickly prepared, needing only a fresh, green salad to make a delici0us and memorable meal.

A note about smoked salmon and caviar: There are enormous differences in quality and a high price may not guarantee the best. Ideally, one would chose wild-caught salmon, but just because it says it is that on the package it may not be true and it may not say anything about taste. It is best to trust your eyes and nose. If buying prepackaged fish in a supermarket, which is not the first choice, but may be necessary, it will be best to buy a package and then open it after paying. If it smells fishy or “off” you can return it without having to drive back to the store. You know then to look elsewhere. Smoked salmon should smell of the sea with a slight smokiness. It should also be deep pink and not light pink or grayish. At most there should be only very few white fatty streaks, which are a sign of poorly farmed fish. If you have a good fish monger he or she will let you smell it before buying. If you find a good source make note of it and you will know what you are getting the next time you buy.
Now about caviar: We have never made this recipe with true caviar such as Beluga or Sevruga (from sturgeon). We generally have trout or salmon roe in the refrigerator and use that. True caviar is such a delicacy that it would be a shame to serve it together with other flavorful ingredients such as those in this dish. When I had it in Spain they served it with the black roe of lumpfish, which is fine, too. The dish can be served without any “caviar,” too.


This is one of those amazingly simple recipes that just work.

For 4 servings

2 small shallots peeled and finely chopped
6 oz (200 g) smoked salmon sliced
2 small tub of caviar (trout, salmon or lumpfish roe are all fine)2 small chilies (or according to taste)
6 oz (200 ml) of sweet cream
2 tsp cornstarch
2 Tbl butter
salt
freshly ground pepper

Cook the spaghetti ‘al dente’.
In a medium pan sautee the shallots in the butter until soft. Mix the cream and cornstarch and add to the pan and cook to thicken.
Reduce the heat and carefully place the slices of salmon in the pan. When the fish is warm correct the seasoning with salt and pepper and serve over the pasta and garnish with a few small dallops of caviar. Serve with a fresh green salad.